
Kids Crafts
Pipe Cleaner Teddy Bear Craft: How to Make a Tiny Chenille Bear
Pipe Cleaner Teddy Bear Craft: How to Make a Tiny Chenille Bear
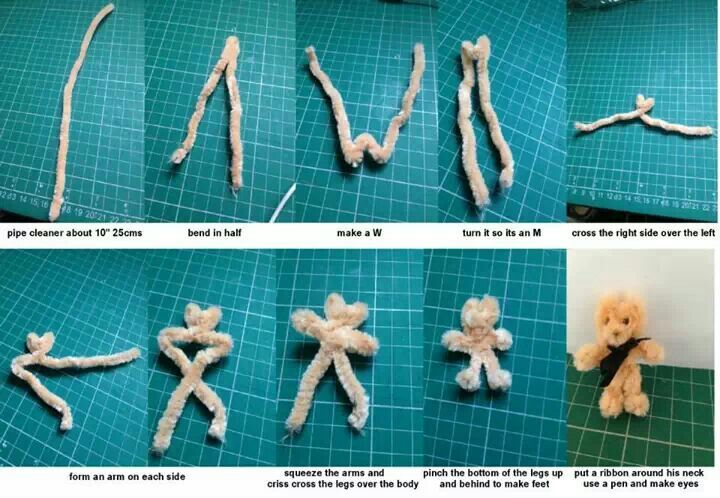
A pipe cleaner may look simple, but with a few bends and twists it can become a tiny teddy bear. The image shows a step-by-step process for shaping a chenille stem into a small bear with arms, legs, ears, and a ribbon accent.
This project is great for older kids, craft clubs, dollhouse accessories, handmade cards, gift toppers, and miniature craft displays.
Supplies You Need
- One fluffy pipe cleaner or chenille stem
- Small ribbon or thread for a scarf
- A pen or marker for tiny eyes
- Scissors if trimming is needed
- Optional glue for securing details
Simple Steps
- Fold the pipe cleaner in half.
- Shape the center into a small head and ears.
- Cross and bend the sides to form arms.
- Twist or squeeze the lower section into a body.
- Separate the ends into two legs and pinch the bottoms into feet.
- Add a small ribbon around the neck and draw tiny eyes.
Helpful Shaping Tips
Work slowly and adjust the bends as you go. A fluffy pipe cleaner hides small mistakes, so the bear can still look charming even if both sides are not perfectly even.
Ways to Use the Tiny Bear
Attach it to a card, glue it to a gift tag, place it inside a shadow box, add it to a fairy garden, or use it as a tiny backpack charm with extra string.
Safety Notes
Because this craft uses wire and small pieces, it is better for older children or supervised craft time. Keep tiny accessories away from younger children.
Final Thoughts
A pipe cleaner teddy bear is a small project with a lot of personality. Once you learn the basic shape, you can make bears in different colors and sizes.